Changing the settings for a User
You can change the settings for a user. You can also change
the name of the user.
Changing the settings for a user
To change the settings for a user:
Navigate to the Users tab in the System Administration
module.
Expand the GainSeeker Logins
tree (if needed).
For the user you want to change, expand the tree.
Change one or more of the settings described below.
Click Submit to
save your changes.
The settings you can change include:
Active Directory
association
This setting is required for Active
Directory integration with GainSeeker.
To associate a GainSeeker user with an Active Directory (AD) user and/or
group:
Right-click or double-click the Active
Directory association setting.
 If
the resulting Active Directory Association
window does not look similar to the example below, GainSeeker cannot
access the Active
Directory domain you provided earlier. You need to specify an
AD domain that GainSeeker can access before continuing.
If
the resulting Active Directory Association
window does not look similar to the example below, GainSeeker cannot
access the Active
Directory domain you provided earlier. You need to specify an
AD domain that GainSeeker can access before continuing.
The message at the top of this window displays any AD user or
group names that are already associated with
In the Search Username
or Search Group Name box,
type the AD user name or group name that you want to associate with
this GainSeeker user. You can also type part of the name and use *
as a wildcard for the remaining characters, like this example:
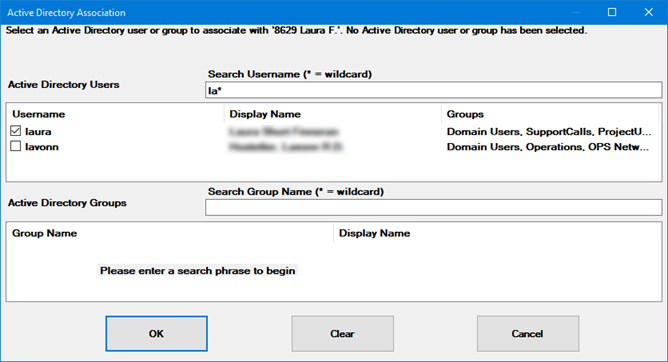
AD will return a list of user names or group names that match your
search criteria. (This can be slow.)
Check the box(es) for the desired AD user name(s) or group name(s).
(optional) To associate
more AD users or groups with this GainSeeker user, repeat the search
for the next AD user or group and check the box for the desired name.
Repeat this step until all AD users or groups have been selected.
Click OK.
Audit trail notifications
This user can automatically receive email alerts whenever certain Audit Trail
events are logged.
To configure which events should email a notification to this user,
right-click or double-click Audit trail
notifications. This will display the following window:
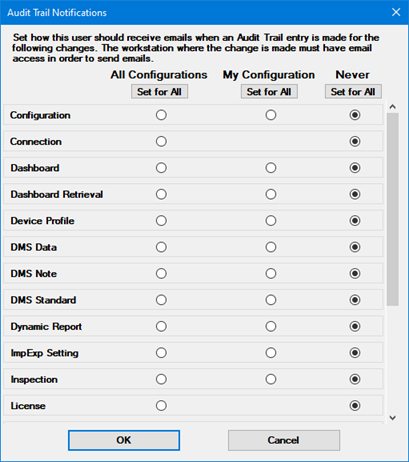
For each category (Configuration,
Dashboard, etc.), choose whether
this user should receive notifications for changes in All
Configurations, My Configuration
(this user's configuration), or Never.
To set all categories the same way, use the Set
for All buttons.
Audit trail emails are never displayed to the GainSeeker user who was
logged in when the event occurred - they are sent silently.
Please note:
The categories listed here match the Audit
Type column in the Audit
Trail utility. (The Configuration
category includes changes to Users, Roles, Configurations, and System-wide
Settings.)
Some categories such as Connection,
License, or SQL
Utility do not apply to a specific configuration. The only
options for these categories are All
Configurations and Never.
These email alerts are not implemented for Legacy GainSeeker
modules including SPC Data Entry, SPC Charts and Reports, and DMS
Charts and Reports.
For emails to be sent, all of the following must be in place:
Audit trail logging must be enabled at the system-wide
level and/or at the configuration
level. GainSeeker will only send emails for events that get written
to the Audit
Trail.
System-wide email
settings must be configured to allow GainSeeker to send email.
This user (being configured to receive email updates) must have
their Email address set.
Any logged-in user who could trigger these Audit Trail events
must have their Email address and Email
options (if necessary) set, so that GainSeeker can send email
from these users.
For this reason, you may wish to simply configure these settings for
all GainSeeker users.
Your IT department must configure your email system so that
any GainSeeker workstation that might trigger these Audit Trail events
is permitted to send email.
For this reason, you may wish to simply request permission to send
email from all of your GainSeeker workstations.
An easy test at any GainSeeker workstation is to use the GainSeeker
Charts module to draw a chart, and then try to email that chart. If
the email is successfully sent and received, then your email system
is set up correctly for that workstation.
Configuration
The configuration contains the program settings you want to be applied
for this login name. For more information, see Configurations
If this user was created with the default settings (instead of copying
an existing user), its Configuration
will be set to Default Settings Configuration.
This means that this user will use the GainSeeker default configuration
settings instead of using a specific GainSeeker configuration.
To select a different configuration for this user, right-click
or double-click Configuration.
Then you can select from a list of available configurations.
Email address
When this user logs in to a GainSeeker module and emails a chart or
other information from within GainSeeker, the "From" address
on that email will contain the email address you specify here.
To specify an email address for this user, right-click or double-click
Email address.
Email options (if necessary)
If your email system requires its own login name and password for authentication:
Expand the Email
options tree.
To enter this user's email login
name, right-click or double-click Email
login name.
To enter this user's email password,
right-click or double-click Email
login password.
Language
You can configure this user to run the PC Collect and GainSeeker Charts
modules in English, Español
(Spanish), or Français (French).
You can also use the default setting: Use
Windows display language:
If the user's workstation is set to run Windows in Spanish or
French, the PC Collect and GainSeeker Charts modules will display
that language.
If the user's workstation is set to run Windows in English or
any other language, the PC Collect and GainSeeker Charts modules will
display in English.
For details about running GainSeeker modules in another language, see
Setting
the PC Collect Language to Spanish, French, or English or Setting
the GainSeeker Charts Language to Spanish, French, or English.
Password
To set or change
the login password for this user, right-click or double-click Password. If you want to clear the
password, leave the New password
and Confirm new password fields
blank.
Note:
Passwords may only be blank if they are not set to require complex
or strong
passwords, and they are not set to expire
at a given interval.
Passwords are case-sensitive.
When you use the Administration module to change a user's password,
GainSeeker does not check against or log the user's
previous password.
Password options
To set GainSeeker policies on forcing this user to change their GainSeeker
login password, or to find out the last time this user's password was
changed, expand the Password options
tree.
Setting |
Desired behavior |
Do this |
Notes |
Password
expires after |
Force
this user to change their login password at scheduled intervals. |
Expand
this tree and select a time period from the list. |
If
Password expires after
is set to a time interval, this item will display the last date
when this user's login password was changed.
When
the system is set to use strong
passwords, GainSeeker will prevent this user from setting the
new password to match any of their last five passwords. (However,
you can reset their password to match one of the last three passwords
by using the Administration module to change the password for
this user.) |
Disable
the mandatory password change at scheduled intervals. |
Expand
this tree and then click Never. |
Password
must be changed at next logon |
Force this user
to change their login password the next time they log in to GainSeeker. |
Select the Password must be changed at next logon
checkbox. |
This is useful
when you first create a new user with a generic password or a
blank password: GainSeeker will immediately prompt this user to
set a new password. |
Priority lists
For information on setting Priority lists for this user, see Priority Lists.
Reserve a license
for this user
If you select this check box, then one of the GainSeeker licenses
you have purchased will be reserved for use by only this user (at
one computer at a time).
This is useful for key personnel or for computers that run automated
GainSeeker tasks, because it ensures that they will never
be prevented from logging in to GainSeeker with the "All
licenses in use" message (unless they try to log in to GainSeeker
on two or more computers at the same time).
Role
Choose the role with the appropriate set of permissions for
this user name.
To set up a new role or review the rights in existing roles,
see Roles.
Note: After making changes,
click Submit to save your changes.
Changing a user name
When you change the name of a user, its priority
lists, stored
sessions, and Audit
Trail records will also be updated with the new name.
Navigate
to the Users tab in the
Administration module.
Right-click the user name and then
click Rename on the menu that
displays.

The New
User dialog box opens.
Enter the new user name, and then
click OK.
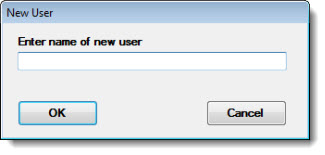
Click Submit
to finish adding the new user name.
Related Topics