Setting up additional traceability columns
The number of traceability columns allowed
By default, 48 traceability columns are created for storing information
about SPC and DMS data. You can increase that number up to 250 traceability
columns. This topic will explain how that is done.
Legacy GainSeeker modules that cannot be used with additional traceability
columns
 Note: Legacy GainSeeker modules
do not function correctly with more than 48 traceability columns.
These include: Note: Legacy GainSeeker modules
do not function correctly with more than 48 traceability columns.
These include:
SPC Charts
and Reports SPC Database Monitor DMS Charts and Reports Enterprise Dashboard SPC Data Entry DMS Data Entry SPC Designer SPC Planner Standalone
versions of modules that are now built into the GainSeeker
Utility module (such as Note Manager, Import/Export Manager,
SPC Standard Utility, etc.)
If you rely on these legacy modules,
you should not use additional traceability columns. However, the
functionality in the modules listed above is built in to the newer
GainSeeker Charts and GainSeeker Utility modules, which do support the additional
traceability columns.
|
 Note: When using more than 48 traceability
columns, all workstations must be updated to version 10.1 or later. Older
versions of the GainSeeker Suite may produce unexpected errors if more
than 48 traceability columns are defined.
How to set up additional traceability columns for a Configuration
While setting up the GainSeeker database
for the first time
If you know that you want to use additional
traceability columns before you have even installed GainSeeker, you can
use a variation of the initial database script to create tables with the
expanded columns, and then use the window shown below to set the number
of columns for the Initial Configuration.
For full instructions, see Database
setup.
While creating a new configuration that
uses all new table names and file paths
Create the new configuration and Submit
the change.
Go to the settings
for Tables and File Paths for the new configuration.
Use the Tables and
File Paths window to set all new file
paths as appropriate for the new configuration, but do
not click
Check for Tables or
run the Table Creation Utility.
Use the Tables and
File Paths window to set all new table
names, but do not
click Check for Tables
or run the Table Creation Utility.
On the Tables and File
Paths window, click the Additional
Traceability Columns button. This will display the
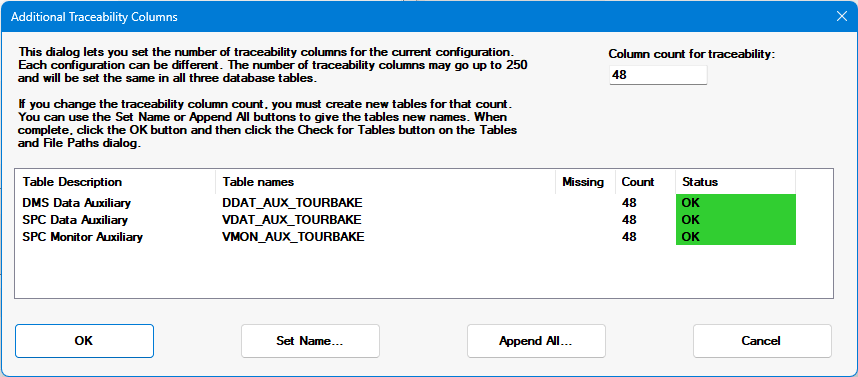
Additional Traceability Columns
window with the default column count of 48:

Enter a new value for the number of traceability columns
- up to a maximum of 250 columns.

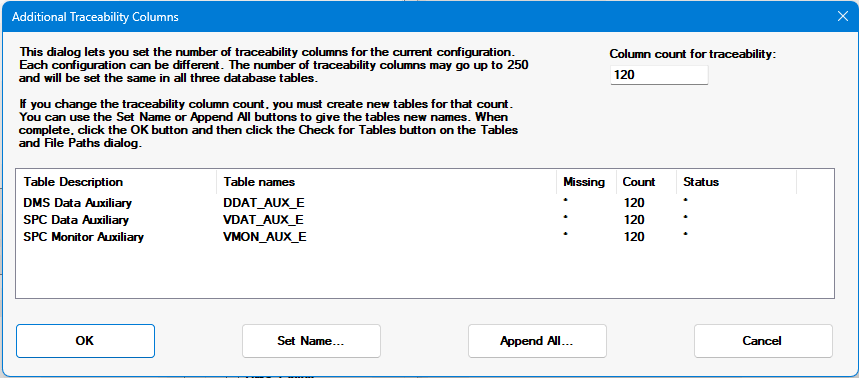
This window compares the column count you specified
to the table names listed below.
If the Missing
column displays an asterisk, then GainSeeker will create
the table with the new number you specified.
If the Table Name already exists, GainSeeker compares
its existing columns with the new number you specified.
If these do not match, you have four options:
Use the Set Name
or Append
All button to specify one or more existing
tables with the new column count you specified
Use the Set
Name or Append
All button to specify one or more existing
table names that do not yet exist, so that GainSeeker
can create the new tables with the new count you specified
Change the count to match the tables listed
Click Cancel
to exit this window without changing the count
On the Additional Traceability
Columns window, click OK
to accept your changes and return to the Tables
and File Paths window.
On the Tables and File
Paths window, click
Check for Tables.
If any tables or file paths are missing, choose the option
to run the Table Creation Utility.
Converting an existing configuration to
use Additional traceability columns
These steps will use GainSeeker to create
new tables with additional traceability columns and then use the export
data and import data functions to copy your existing data records into
these new tables.
Select a current configuration
whose tables you wish to convert. Anyone using the tables referenced
in that configuration must log out of GainSeeker and remain logged
out until this process is finished.
Ensure that you have a good backup of the tables you want
to re-create. GainSeeker will not
automatically drop or alter these tables or the data they contain,
but you will probably want to manually drop the tables after data
has been imported into the new tables.
Use the GainSeeker System Administration module to copy
the current configuration to a new configuration and Submit the change.
 The remaining steps instruct you to change the
tables for your current GainSeeker configuration, using the new
configuration in a purely temporary capacity. If you prefer instead
to make all changes in the new configuration and "retire"
the old configuration after the process is complete, you may reverse
the configurations listed in the remaining steps.
Go to the settings for
Tables and File Paths for the current configuration.
Use one of these options to set new table names:
Use the Tables
and File Paths window to set all new table
names, but do not
click Check for Tables
or run the Table Creation Utility. For tables that were
created in versions 8.5.2 and below, this has the added
benefit of recreating all tables to use variable-length
character (varchar) fields
which help to reduce
your database size on Microsoft SQL Server and MySQL
databases.
If you do not set the new table names on this window,
then you must do so on the Additional
Traceability Columns window in the steps below.
This option makes it easy to convert only
the tables that are affected by the additional traceability
columns you specify.
On the Tables and File
Paths window, click the Additional
Traceability Columns button. This will display the
Additional Traceability Columns
window with default column count of 48:

Enter a new value for the number of traceability columns
- up to a maximum of 250 columns.

This window compares the number of columns you specified
to the table names listed below.
If the Missing
column displays an asterisk, then GainSeeker will create
the table with the new field lengths you specified.
If the Table Name already exists, GainSeeker compares
its existing field lengths with the new field lengths
you specified.
If these do not match, you have four options:
Use the Set Name
or Append
All button to specify one or more existing
tables with the new field lengths you specified
Use the Set
Name or Append
All button to specify one or more existing
table names that do not yet exist, so that GainSeeker
can create the new tables with the new field lengths
you specified
Change the field length settings to match the
tables listed
Click Cancel
to exit this window without changing the field
lengths
On the Expand Column
Column window, click OK
to accept your changes and return to the Tables
and File Paths window.
On the Tables and File
Paths window, click
Check for Tables.
If any tables or file paths are missing, choose the option
to run the Table Creation Utility.
Use the GainSeeker Utility to
Export data from the original tables. Then use Import
data to load the data into the new tables. You must use the
XML format for both the import and export of data. It is better
to move the data in small groups rather than all the data in one
export/import session. You can do this by filtering on Part numbers
or date ranges.
 Note:
Any Users that specify a configuration of "Default Settings
Configuration" must be edited to specify one of the configurations
listed.
Related topics
Tables
and File Paths
Setting up Expanded data field lengths
 Note: Legacy GainSeeker modules
do not function correctly with more than 48 traceability columns.
These include:

